Deepfake technology has gained immense attention in recent years, making it a topic of interest for creators and technologists. If you're curious about how to create a deepfake, this guide breaks down the process into manageable steps. Whether you’re preparing for a demo or simply exploring this fascinating technology, here’s everything you need to know.
Hardware and Software Requirements
Before diving into the steps, ensure you have the right setup:
Hardware:
- PC: High-performance computer with a modern GPU, fast CPU, ample RAM, and sufficient storage.
- GPU: Nvidia RTX with at least 12GB VRAM (16–24GB recommended for higher quality).
- RAM: Minimum 16GB.
- CPU: A modern 6–8 core processor supporting AVX and SSE instructions.
Software:
- Operating System:
- Windows 11 (supported).
- Linux (for advanced users seeking potential performance gains).
Step-by-Step Deepfake Creation
In order to help you out with the data extraction, we created a Google Drive with some scripts as detailed in the steps below. In order to get access to the Drive, please send us a message to deepfake@truly.ws
Step 1: Gather Source Material
Your dataset is the foundation of the deepfake process. Follow these tips to collect and prepare high-quality material:
- Video or Photos:
- Use videos for capturing diverse angles and expressions.
- Photos provide sharp results for frontal views.
- Full Coverage:
- Angles: Include left, right, up, down, and straight-on views.
- Expressions: Smiles, eyes open/closed, and other facial movements.
- Consistency: Maintain uniform resolution and lighting across images. Avoid mixing high- and low-resolution materials.
- Dataset Size: Aim for 3,000–8,000 images. Stay under 12,000 for efficiency.
Step 2: Prepare Video for Frame Extraction
Edit and combine your source videos to focus solely on the subject:
- Trim and crop: Make sure each frame contains the face only without other object such as cup of coffee, hands or any other item.

- Export: Save the video as an MP4 and place it in the
workdir/srcdirectory. Here is how it looks like for Ted Pick, Morgan Stenly CEO:
Step 3: Extract Frames
Run the "1_extract_images_from_video" script to extract frames from the video. These frames serve as the building blocks for your deepfake.
Step 4: Face Extraction
Use the "2_faceset_extract" script to extract faces.
For the parameters, pick 256 for image_size, and 100 for quality.
- Tip: Manually review and clean the dataset to remove false positives or incorrect detections. The output is located under workspace/src/aligned

Step 5: Use XSeg Model for Masking
Apply XSeg masks to the dataset usings "3_XSeg_mask_apply".
Step 6: Pack the dataset
Use the script "4_1_data_src_util_faceset_pack" for packing the entire aligned faceset into one file for fast loading.
Step 7: Model Training
This is where the deepfake magic happens.
- Initial Training: Run "5_train_SAEHD" and choose the following settings:
- Autobackup every N hour: 0
- Write preview history: n
- Target iteration: 0
- Flip SRC faces randomly: y
- Flip DST faces randomly: y
- Batch size: 4
- Masked training: y
- Eyes and mouth priority: n
- Uniform yaw distribution of samples: y
- Blur out mask: y
- Place models and optimizer on GPU: y
- Use AdaBelief optimizer: y
- Use learning rate dropout: n
- Enable random warp of samples: y
- Random hue/saturation/light intensity: 0.0
- GAN power: 0.0
- Face style power: 0.0
- Background style power: 0.0
- Color transfer for SRC faceset: none
- Enable gradient clipping: n
- Enable pretraining mode: n
- Refine Training:
- After ~10 hours, stop and save the training by entering ENTER while the preview windows is focused
- Start the training script with the following changes:
- Eyes and mouth priority: turn on
- Random warp: Turn off.
- Enable GAN power: Set to 0.1.
Step 8: Export the Model
- Use "6_export_SAEHD_to_dfm" to save your model as
dfm. - Rename the exported DFM. the new file is located in workspace/model/new_SAEHD_model.dfm
Final Step: Live Demonstration with DeepFaceLive
-
Install deepfacelive with the installer given in our drive “DeepFaceLive_NVIDIA_build_07_09_2023”.
-
Go into the directory created "
deepfacelive", then to userdata/dfm_models and place the renamed DFM file you have into this folder. - Luanch the .bat script "DeepFaceLive" to start the program.
-
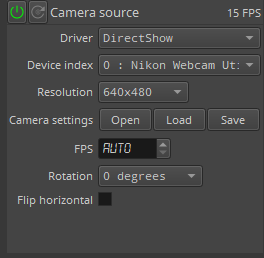
Under Camera Source, choose your camera in the devide_index and wanted resolution to stream with. we recommend 640x480.
-
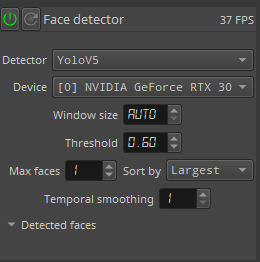
Choose the following settings for face detector:
-
In Face aligner, choose “from points” under mode:
-
Use Goggle FaceMesh marker, with your GPU device:
-
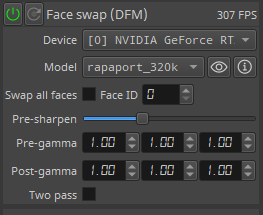
Now go to faceswap DFM and choose the model you have put in the dfm_models directory
-
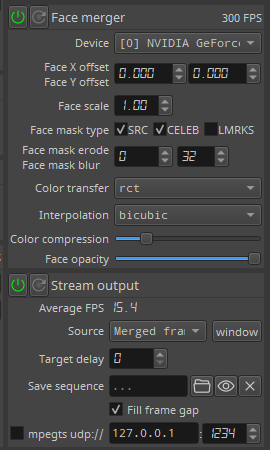
In the “Face Merger” section, select the color transfer option as “rct.”
Stream the output by choosing “Stream output” with “Merged frame” as the source and setting “Target delay” to 0.Click on the “Window” to view the output on a larger screen.


And that’s it - you’re all set!
Conclusion
By following these steps, you'll be equipped to create and demonstrate deepfake technology with confidence. While the process requires attention to detail and powerful hardware, the results are a fascinating exploration of AI and creativity.
Remember: With great power comes great responsibility. Always use deepfake technology ethically and transparently.